Identify Your Website’s Purpose
Starting with your goal can help you choose the best website builder for your purpose. For example, if you want to sell products, choose an e-commerce platform or a website builder with e-commerce features.
Here are some examples of the types of websites you can create:
- E-commerce/online store
- Personal blog
- Small business
- Portfolio
- Lead generation
- Membership/subscription
- Nonprofit
- Podcast
- Family/wedding/baby shower site
Once you know the type of website you want to create and its purpose, it will be far easier to tackle the next steps.
According to Anthony Buzzeta, the CEO and founder of tech news site G TIER, “The first step is to identify your website’s purpose. What do you want your site to accomplish? Is it a personal blog or an e-commerce store selling products? Listing these goals clearly will help guide every decision after this one.”
Choose a Domain Name
A domain name is the URL or website address you type into a browser to visit your website.
Here are some tips for choosing a domain name:
- Choose one that’s easy to spell and remember
- Avoid abbreviations
- Relate it to your name or business
- Keep it short
- Pick a common top-level domain (TLD) like .com
Whenever you have some ideas you’d like to go with, search what’s available. Most domain registrars have a free search tool you can use. If you need additional help, you can try a domain name generator, too.
Carmen Stevenson, CEO of the Tablet Feast tablet review site says, “When selecting a domain name, it is crucial to opt for a partial match that conveys your website’s topic to Google and your users. For instance, if your website focuses on pizza, a suitable name could be ‘PizzaFeast’ or a similar variation. This approach enhances your website’s visibility in search engine optimization (SEO) and facilitates user understanding.”
Registering Your Domain
There are two main choices for registering a domain name:
- Going through a domain registrar
- Bundling a domain with web hosting or a website builder
Domain registrars are the optimal choice if you want to register multiple domains, buy and sell domains, park domains, or you’ve already secured hosting. Domain registrars are usually a few dollars cheaper per year compared to alternative options.
But when you’re creating a new website from scratch, bundling domain registration and web hosting is the easiest and fastest way to get up and running—especially if you’re a beginner.
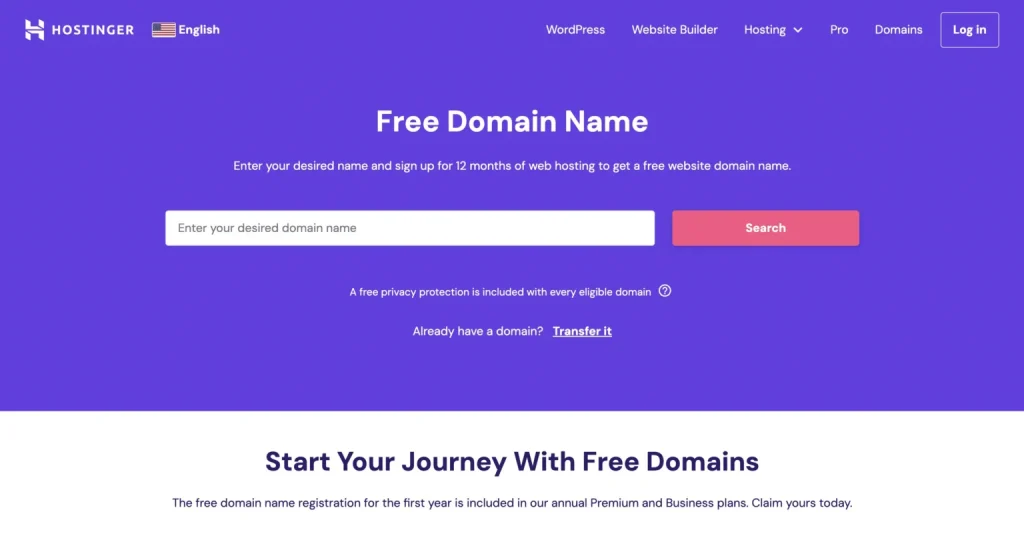
If you’re creating your site with Hostinger and WordPress, you’ll even get a free domain for your first year when you sign up for a new web hosting plan. Just enter your desired domain name, and Hostinger will add it your cart for free when you select a Premium or Business hosting plan.
Aside from the free domain for one year, which is an excellent value, the top benefit of registering your domain with a Hostinger web hosting plan is the simplicity.
Instead of registering it elsewhere and then having to connect it to Hostinger later on, you’re keeping everything under one roof. This simplicity is invaluable for beginners, and it means you can start working on your website right away.
Sign Up for Hosting or a Website Builder
There’s no right or wrong answer here, and there are definitely pros and cons to each route.
Website builders are super easy to use, but they’re not as flexible and you may run into some limitations down the road. Hosting can be a bit more challenging to set up, but it’s usually more affordable, more flexible, and more versatile.
Hostinger’s web hosting plans start at just $2.99 per month, which is affordable for any budget. WordPress gets installed with just one click, and you’ll even get a free website builder included with your plan.
Using WordPress with web hosting gives you complete control over the look and feel of your website, plus you’ll be able to easily move it to a different hosting provider later if you want to. You can even use a third-party website builder with WordPress–Elementor is a great example. It adds drag-and-drop functionality to your WordPress site.
There are dozens of other WordPress builders out there. And even if you use one, you can still switch hosting providers without having to rebuild your site.
Conversely, website builders tend to come with hundreds of starter templates you can easily customize–it’s the easiest and fastest way to get a new site live, plus they typically come with bonus features like ecommerce functionality, booking and appointment tools, free marketing features, and more.
The downside of website builders is that they’re more expensive and less customizable. You also won’t be able to move your site somewhere else. You’ll have to rebuild the entire thing if you ever decide to switch to a different builder or host.
Ultimately, the choice is up to you. But we highly recommend web hosting + WordPress for anyone serious about starting and growing a new website. Hostinger is our favorite host and offers everything you need to get started, including a fail-proof onboarding process and a free drag-and-drop website builder that works in conjunction with WordPress. It’s the best of both worlds.
Either way, sign up for a plan and follow the onboarding instructions to get started.
Customize Your Website
“Consider factors like color schemes, typography, imagery, and navigation when designing your website,” says Ali Husnain of reloadux, a UX design studio. “Make sure your design aligns with your brand or industry, and that it’s easy for users to navigate and find what they’re looking for.”
Choose a Template or Theme

Templates (or themes) are pre-made designs you can use on your website and fill in with your own content. Choosing the right one comes down to a few key factors.
Look for a template or theme that:
- Makes sense for the type of website you’re creating, such as an online store
- Works with your or your brand’s aesthetic
- Fits your budget (many are free to use)
- Resizes based on the device used (mobile-responsive templates)
Usually you don’t have to worry about the color scheme because most builders make it easy to change. Some include pre-built themes with color combinations that are popular or have two complementary colors.
Install Plugins
Sometimes referred to as apps, plugins add functionality to your website. This is true whether you’re using a website builder or host + WordPress. They come in all shapes and sizes–some are free, some are paid, some are regularly updated, some may be abandoned.
Some plugins you might want to consider:
- Yoast SEO: Can guide you to creating better content optimized for search
- Elementor: Acts as an excellent website builder for WordPress
- Tidio Live Chat: Add a live chat messenger to your website to provide support to visitors
- PayPal: Can help you secure more sales on online stores if your website builder allows it
- Social media feeds: Add your Instagram, Twitter, or Facebook feed to your website to encourage engagement
Every website builder or web host handles app or plug-in installation differently. Generally, you can find an app or plug-in marketplace. Click on the plug-in you want, and there will be an “add” button somewhere.
Add Ecommerce to Your Website
While this is an optional step, it’s likely a popular one — a major reason behind wanting to build a website is that you want to promote or sell something. Most web hosting services offer packages and upgrades to add a storefront to your website, though this isn’t the only way to offer products to customers.
Amanda Walls, the founder and director of the digital marketing agency Cedarwood Digital, recommends the following when creating an ecommerce website:
Optimize Your Site for Organic Search
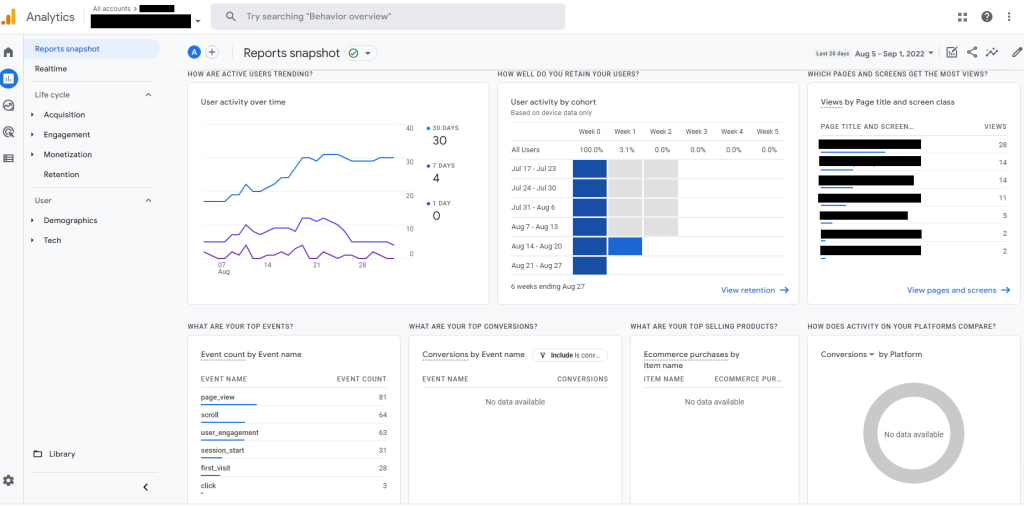
Using a good SEO strategy can increase your website’s visibility on Google and other search engines. You can optimize your website’s SEO using Google Analytics, adjusting permalinks, and using relevant keywords.
Add Google Analytics

Google Analytics 4 is a great way to track your site visitors. It helps you understand where your visitors originated (search traffic vs. direct traffic vs. referral traffic). Use the Google Analytics e-commerce features to see which pages are most popular, which days you get the most traffic, and which keywords work best for your site.
Most builders offer an easy way to add Google Analytics to your website — just add the tracking ID to a field. You can find your tracking ID in your Google Analytics profile after creating an account.
Just copy your tracking ID from your profile and add it to your header.php file (you can usually access this from a WordPress dashboard under Appearance > Theme Editor to do it manually.
Change permalink structure
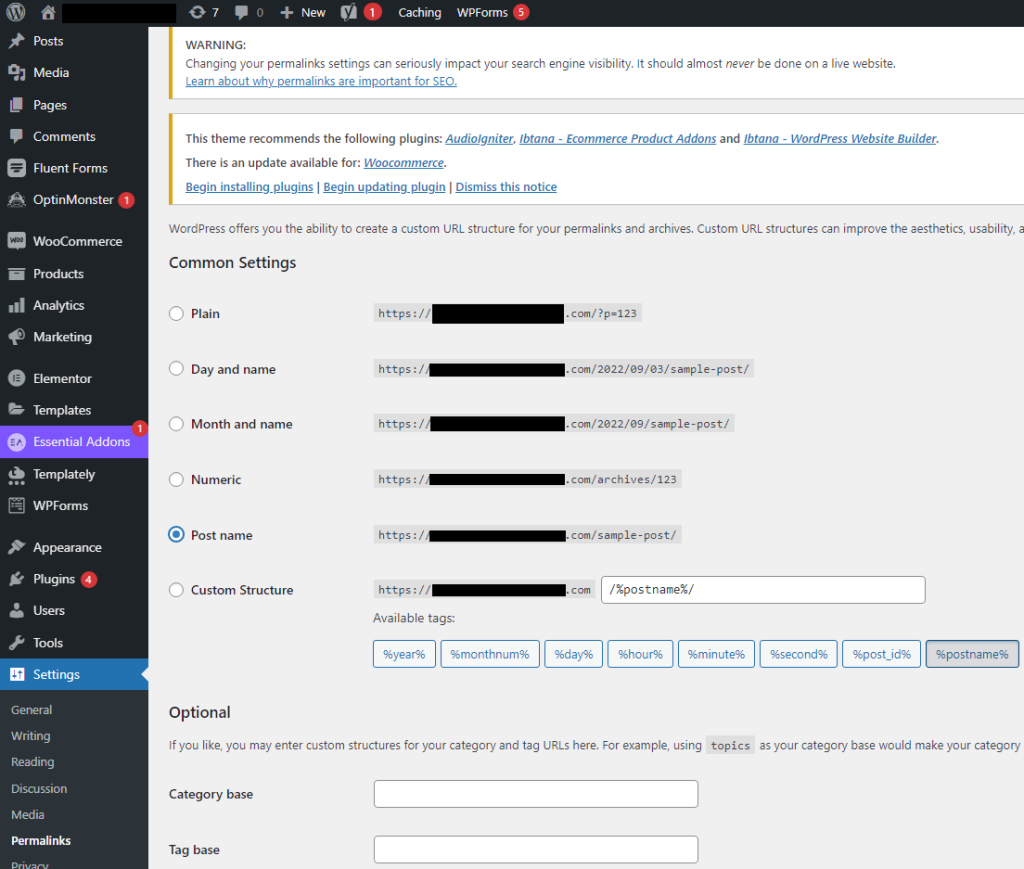
It’s a good idea to change your permalink structure at the beginning of your website’s journey before you get too deep into adding pages and content. If you change the structure later, you could deactivate any pages you previously published.
Every builder is different, so you may need to find the answer in help documentation or speak to a customer support agent.

For WordPress, go to the Dashboard > Settings > Permalinks. From here, choose the structure you like the best, or create a custom permalink structure.
The best permalink structure is the post name. These links are much more SEO-friendly because they’ll usually include keywords related to your industry, website, or content. It’s good for visitors and search engines for the same reason: the link text informs what the page or post is about.
Use Google’s keyword planner
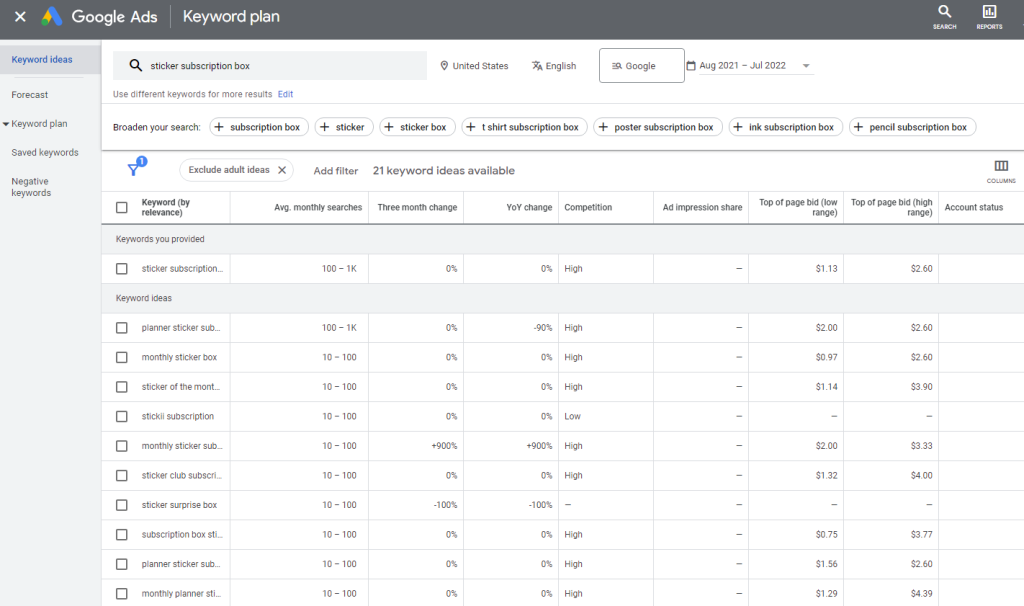
One of the most useful free tools you can use to help your website rank in organic search results pages (SERPs) is Google keyword planner. It’s a tool within Google Ads, an advertising platform that uses keywords to help your ads appear in relevant searches. Create your account at ads.google.com and go to the keyword planner.

Type keywords relevant to your industry or the content you’re creating. For example, in this case, I typed in “sticker subscription box.” The information I got isn’t granular, but it gives me a good idea of what my competitors are targeting (and what audiences may be searching for).
Given the information in the screenshot above, I might create content around the keyword “sticker surprise box” if I offered a product like this.
Chances are my page, post, or product would rank high in the search results because there isn’t much competition for that keyword. On the flip side, it doesn’t look like many people are searching for that term, either.
Publish Your Website
You’re nearly ready to publish your website. As with all other steps outlined in this guide, publishing will be different with each website builder. Usually, you can find a “Publish” button in the site editor you’re using.
Ian Reynolds of Brightvue Digital Limited, a 20-year veteran in the web design and tech industry, recommends going over everything with a fine-toothed comb prior to going live. “Before launching, thoroughly review your website for any errors, broken links, or inconsistencies. Test its functionality across different browsers and devices.”
Once you’re ready, click on the publish button and wait as the site builder creates a sitemap and gets your website live. You can then go to your URL and see your live website. On WordPress, you’ll see a publish button at the top part of the menu.
You should have the foundation of your website done now, including the home page, at least. Now you can build out other pages, such as a contact page, product pages, an about us page, and a blog, depending on what type of website you created, such as an online store.
Congratulations. You’ve published your website. But your work isn’t done.
Manage and Maintain Your Website
If you’re using an all-in-one website builder, a lot of the maintenance of your website is automatic. Plug-ins get regular updates, as well as the site editor. Automatic backups are common, too.

If you use WordPress, you may need to set up automatic updates of plug-ins or check regularly to ensure you update to any new versions. Keeping WordPress and plug-ins updated is part of security, so stay on top of this.
Ffion Wright, the creator of Blog as a Job advises, “Remember to back up your site! Regularly back up your website to protect against data loss or potential disasters. If using WordPress, plug-ins such as DuplicatorPro or UpdraftPlus can help with this.”
Create backups of your website any time you make significant changes, so if anything goes wrong, you can roll it back to the most recent version of your website and not suffer a big content loss.
Marketing is a big part of the ongoing management of your website, too. It is always important to keep on-page SEO in mind.
Also, consider adding your website to online directories, budgeting for a pay-per-click (PPC) ad campaign, posting to social media, and finding ways to attract new visitors and retain customers or readers you already have.
Here are some other steps to maintain and manage your website:
FAQs About Creating a Website
Can you create a website for free?
Can you build your own website?
What do you need to build a website?
How much does it cost to create a website?
How long does it take to build a website?
What do you need to run a website?
Do I need a web host to create a website?
Which is the easiest website builder?
How do I build an online store?
How long does it take to set up a WordPress website?
Learn More About Creating a Website
- CMS vs. Website Builders
- How To Build a WordPress Website
- How To Build a Website With Python
- How To Build a Squarespace Website
- How to Create a Website with Wix
- The Best Website Builders
- Best Web Hosting Providers
- The Best Domain Registrars
- Best Website Builders for Beginners
- How Long Does It Take To Build a Website?
- How To Create a Website for Free

